- 100g of dark (at least 70%) chocolate
- 150g butter
- 300g of caster sugar (golden if you are going out specifically to buy it)
- 4 medium eggs (if you have large use 3 plus one yolk)
- 150g of self raising flour
- pinch of salt
- 1 tsp of vanilla essence (optional)
- 100g of nuts, pecans or walnuts are best (optional)
Get out whatever tray you are baking the brownies in. A small deep roasting tin, or a square cake tin both work fine. If you have a dedicated tray bake tin use that you lucky person!
Line it with a bit of butter and greaseproof paper, I know it’s tedious but it it will be worth it later. Switch your oven on, somewhere in between 140 and 180 degrees centigrade. I’d love to give you a more accurate temperature than that but I really can’t, the numbers have been cleaned off my oven round the dial…
melt the butter and cholocalte in a pan over a low heat
take the pan off the heat and stir in the sugar until it is less grainy
beat in the eggs one at a time
stir in the flour and salt
add the optional ingredients if you are using them
Stick the mix in your prepared tin and chuck it in the middle shelf of your oven.
It’ll take around 20 to 40 minutes depending on the size of your tin and your oven. You know both better than me so just use your judgement. It is done when they have risen away from the edges of the tin, and a cocktail stick (or a fork) comes out clean when you poke it in the middle.
Leave to cool and cut into squares. If you like.
Tip: if you have under cooked them a bit and are a bit too squidgy, put them in the fridge, they’ll firm up a bit and they’ll still taste great in any case.
Maple Syrup Cheesecake
May 5th, 2009
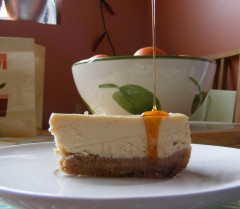
Maple syrup and cheesecake; what’s not to love? This recipe is based on a Nigella Lawson one which can be found in her Nigella’s Christmas book. Mine is slightly simplified and omits the nuts.
I discovered this recipe in one of those magazines that comes with a Sunday newspaper in 2006. (If I’m going to admit to it, it was You that comes free with The Mail on Sunday, I hasten to add that I did not purchase said paper, but I usually do scour any supplements lying round the house for recipes.)
A total no-brainer - maple syrup and cheesecake; what’s not to love? Well Nigella Lawson apparently as this is adapted from one of her recipes. I’m quite fond of the voluptuous chef but I know there are quite a few that don’t like her sexy-food-ways on the television.
When I moved out a while later, I thought I took the ragged, ripped out pages with me inside one of my cookery books, but when I came to look for it to make the cheesecale, I had misplaced it.
I checked through my copies Nigella’s books and through the ones I didn’t have at my boyfriend’s mam’s house but I couldn’t find the same recipe. I could remember most of the ingredients, but not the quantities. (Turns out this recipe is in Nigella’s Christmas if you are after an un-bastardised version.)
On my next phone call home to the parents, I asked my mam if she knew where the loose pages were. She had seen that I had pulled them out to take with me and thoughtfully put the pages inside another cookery book. That wasn’t mine. That was hers. And therefore still in her kitchen.
Anyway, she read me the ingredients and quantities over the phone and as I was writing them down I changed them a bit. So this is my resulting recipe based on Nigella Lawson’s Gleaming Maple cheesecake:
- 100g of unsalted butter
- 12 Digestive biscuits
- 600g of cream cheese (I’d recommend you use full-fat)
- 125ml of maple syrup (it’s usually half a jar if you don’t want to dirty a measuring jug)
- 50g of caster sugar
- 2 teaspoons of cornflour
- 4 eggs
- Half a teaspoon of cider vinegar (you can use lemon juice as directed by the original recipe but I think the taste is a little distracting)
- 20-22cm spring-form cake tin
- A roasting tray big enough to get the cake tin in (for the bain-marie or water bath)
- Cling film and strong foil
- Oven set to 170 degrees Centigrade
A couple of hours before you start get your eggs, cream cheese and maple syrup out of the fridge, and make a space for the cheesecake to go in later. Turn your oven on to the right temperature.
If you have a food processor - get it out, it takes a fraction of the time to make if you have one.
First blitz up the biscuits, or split them into two food bags and bash them to pieces with something heavy if you don’t have a food processor. Then add the cold butter in chunks and blitz again until it has clumped together in the mixer. If not using a food processor, melt the butter in a saucepan (big enough to accommodate the crushed biscuits) then stir in the digestives.
Push the biscuits into the bottom of the tin with your fingers or the back of a spoon, then wrap the tin in two layers of cling film and then two layers of foil to protect the cheesecake while it is baking in the water bath. Put the tin in the fridge.
Clean out the processor jug or grab a quite big mixing bowl, and whack in your cream cheese, sugar, maple syrup and cornflour. Mix this up until it is all incorporated. Use a whisk if you aren’t using a processor, but try not to whisk in too much air. Baked cheesecakes are supposed to be dense.
Put a full kettle on to boil.
Add the eggs one at a time and mix or process again. Finally add the cider vinegar and mix.
Take your tin out of the fridge and place it in the roasting dish. Top the biscuits with the cheesecake mixture and level out the top with a spatula. Fill the roasting dish with hot water from the kettle - about half way, then put into the middle of the oven.
The cheesecake in my experience will take between 50 minutes and an hour and a half. I once made this at my boyfriends parents house, they have a fan assisted oven - I set the timer for an hour, and it was overcooked when I got to it. On the other hand when I make it at my parents house, they have a Rayburn - it can take up to an hour and a half. Don’t worry how long it is in the oven for, just keep checking on it, it’s not like baking a cake, it won’t sink. You just have to set the eggs in it. It will be perfect when, when you shake it gently, it will wobble slightly in the middle.
Serve with a little more maple syrup poured over the top.
Nigella reckons this serves eight, but if you are serving it after dinner you can get away easily with ten servings.

Orange and Cardamom Cake
April 14th, 2009
Knowing that orange and cardamom go together quite nicely I decided to try and bake a cake that contains them. This was my first attempt and as I liked the results I thought I would share the recipe.
Cake:
- 100g of unsalted butter
- 100g of caster sugar
- 100g of self raising flour
- 1 large egg
- Juice and zest of one largeish orange
- 10 cardamom pods
Topping:
- 150g of cream cheese
- 50g of unsalted butter
- 2 tablespoons of icing sugar
- A little bit of juice from the orange
Decoration:
- 50g of caster sugar
- A little bit of juice from the orange
- 18-20cm cake tin
Set your oven temperature to 190 degrees Centigrade and grease or line your cake tin.
Put the cardamom pods in just enough water to cover them and simmer gently over a low heat for around five minutes. Leave the water to cool for another five then take out the pods.
Cream the butter and sugar together until it has lightened in colour slightly. Beat in the egg, and add the orange zest. Sift the flour into the mixture and fold in carefully. Add the cardamom water, then enough orange juice to give a good cake batter consistency. (Remember to keep some back for the icing of you can, otherwise just use another orange later if you need all the liquid.) Put the cake mixture in the tin and bake for around 35 minutes, or until a skewer inserted into the middle comes out clean.
In a clean bowl mix together the sugar, butter and cream cheese. Then add enough orange juice to make it change colour a little bit, but not so much that it goes runny. You probably need no more than two tablespoons. Reserve to spread on the cake later.
In a heavy-bottomed saucepan mix together a little orange juice with the remaining caster sugar over a low heat stirring all the time. Once the sugar has melted turn up the heat and stop stirring. Bubble the sugar down until it has turned caramel-ly. (Keep smelling to check it hasn’t burned, as you won’t be able to see when the sugar burns as it will already be orangey coloured from the juice.) Allow it to cool for a moment then spread it out on to something non-stick. That re-useable cake liner stuff is good for this, but you can use a chopping board. Pop it in the fridge if you have room, until is it hard. Give it a couple of hours.
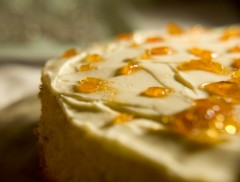
Once the cake is out of the oven, cool on a wire rack until cold. Tip the cake out onto a plate and spread the top with the cream cheese icing. Take the orange sugar out of the fridge and break it up with your fingers or the handle of a knife. Sprinkle on the top of the icing. More pictures on Flickr.
